
들어가며
프런트엔드 개발자가 개발을 함에 있어서 인증과 인가, CRUD와 관련된 API 등 백엔드 요소들이 꼭 필요합니다.
이것들이 없다면 프런트엔드 개발자가 만들 수 있는 프로젝트의 범위는 굉장히 축소되는데요.
단순한 CRUD 기능과 Auth 기능만 추가되어도 꽤 숨통이 트일거에요.
물론 관련 지식과 역량을 쌓아서 직접 백엔드 개발도 할 수 있다면 좋겠지만 어려움이 있죠.
그럴때 supabase라는 서비스를 이용해보면 어떨까 싶어서 소개합니다.
supabase
Supabase is an open source Firebase alternative.
Start your project with a Postgres database, Authentication, instant APIs, Edge Functions, Realtime subscriptions, Storage, and Vector embeddings.
Supabase는 오픈소스 BaaS*로서 Google Firebase의 대안으로 소개하고 있어요.
PostgreSQL 데이터베이스를 기반으로 인증, 인스턴스 API, Edge 기능, 실시간 구독, 스토리지 및 벡터 임베딩 기능을 제공합니다.
클라우드에 가입해서 바로 사용하거나 오픈소스이니 로컬환경에서 자체 호스팅 하여 사용할 수 있어요.
* BaaS란? (Backend as a Service)
BaaS는 클라우드 서비스로, 애플리케이션 개발 시 필요한 백엔드 기능들을 제공하는 서비스입니다.
BaaS는 프런트엔드 개발자가 서버 관리, 데이터베이스 설정, 인증 시스템 구현 등 복잡한 백엔드 작업을 대신 처리해주므로, 개발자는 프런트엔드 개발에 집중할 수 있습니다.
With Supabase
supabase 홈페이지를 둘러보니 여러가지 플랫폼과 프레임워크를 지원하고 있어요.
일단 회원가입부터 프로젝트를 생성해봐요.
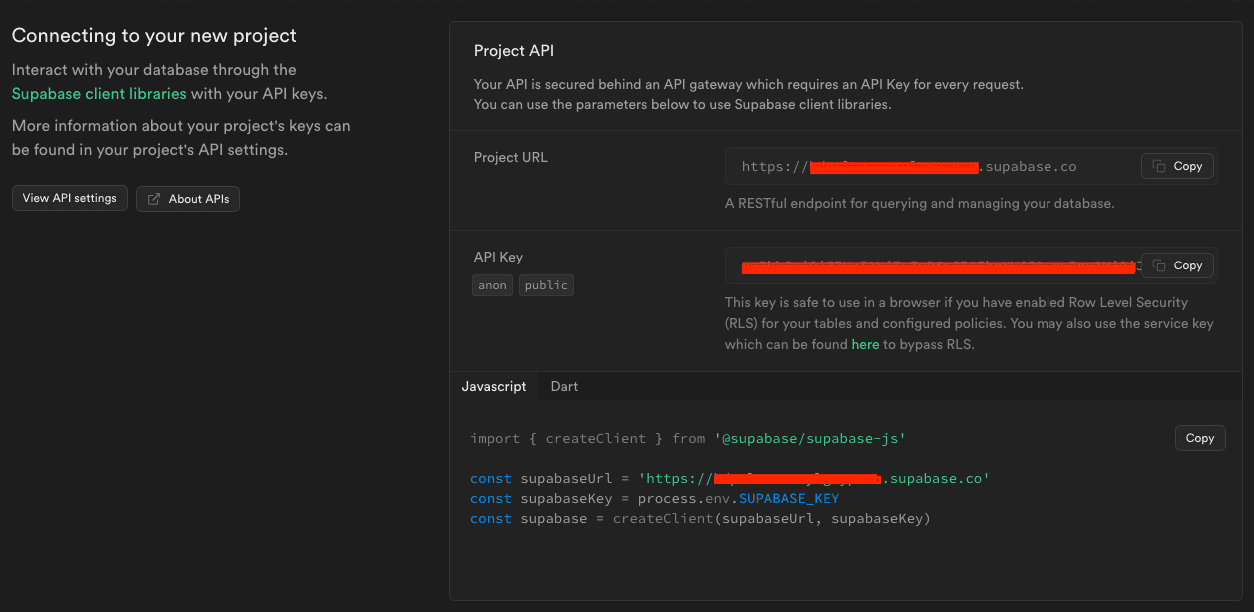
프로젝트를 생성하고 나면 Projecct API를 확인할 수 있는데 Project URL과 API Key는 환경변수 설정에서 사용할거에요.
그 다음 next.js에서 제공하는 supabase 예제를 통해 빠르게 한번 훑어봐요.
https://github.com/vercel/next.js/tree/canary/examples/with-supabase
npx create-next-app -e with-supabasecreate-next-app 명령과 템플릿을 사용하여 with-supabase로 미리 구성된 Next.js 앱을 만듭니다.
프로젝트 루트에 .env.example 파일이 있어요. 파일명을 .env.local 로 변경합니다. (새로 만들어도 되고..)
# Update these with your Supabase details from your project settings > API
# https://app.supabase.com/project/_/settings/api
NEXT_PUBLIC_SUPABASE_URL=your-project-url
NEXT_PUBLIC_SUPABASE_ANON_KEY=your-anon-key
그리고 실행해봅니다. (npm run dev)
오른쪽 상단에 로그인 버튼을 누르고 로그인 페이지로 이동해봅니다.
다시 supabase 웹사이트로 이동해서
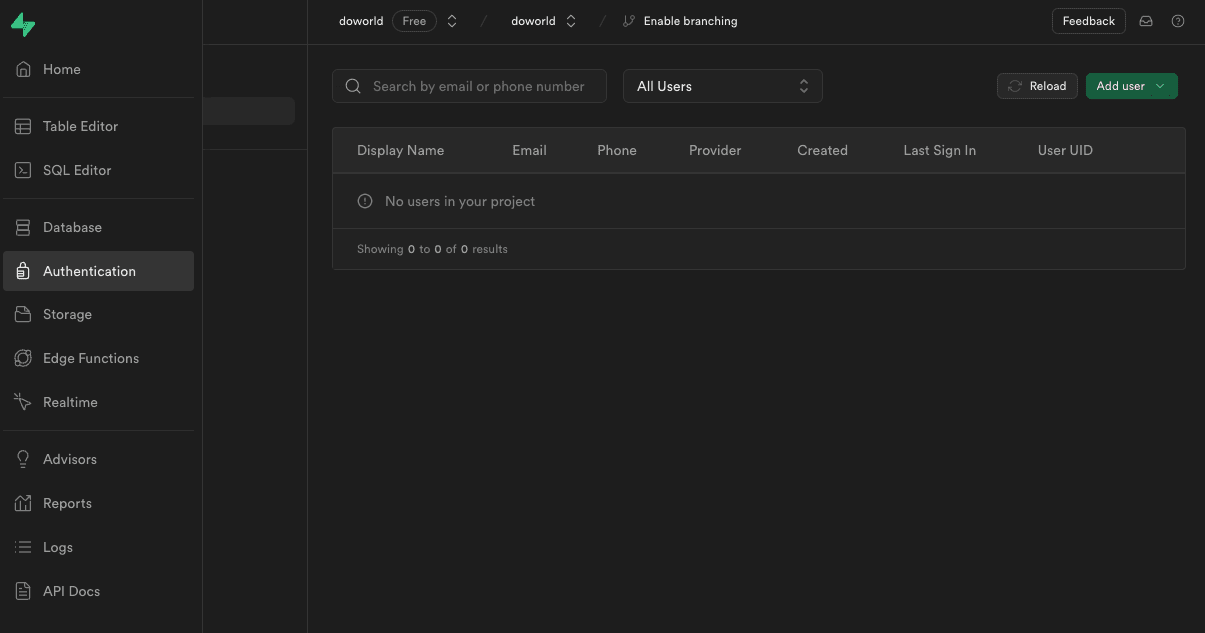
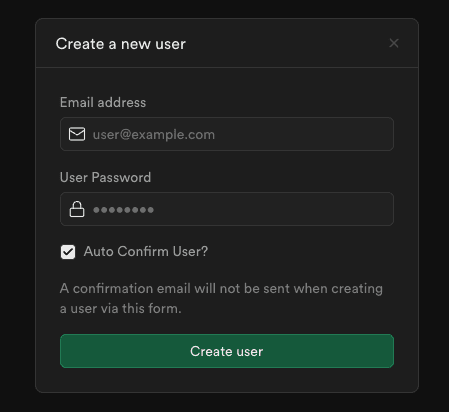
여기서 생성한 사용자 계정으로 Next.js 앱에서 로그인을 해요.
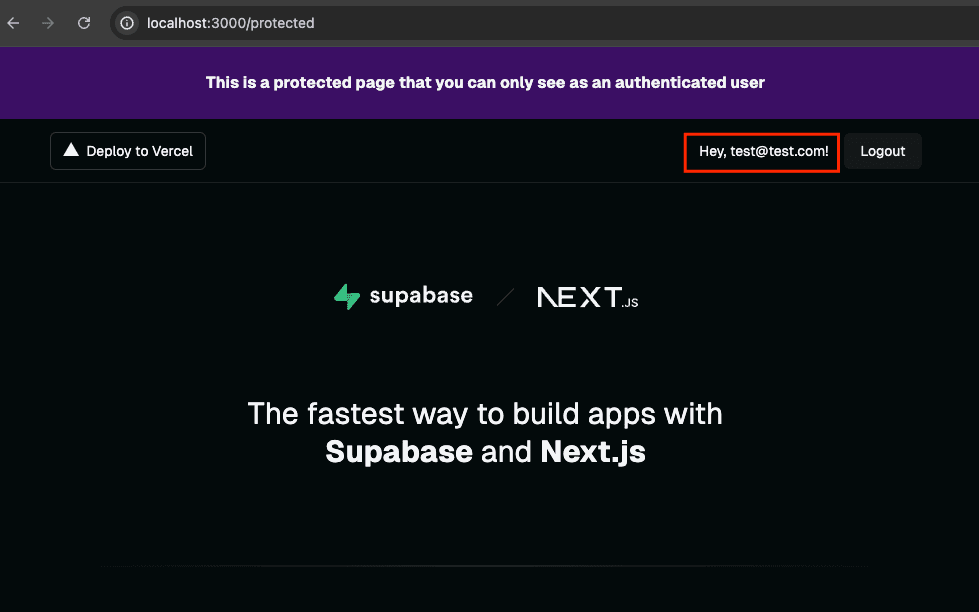
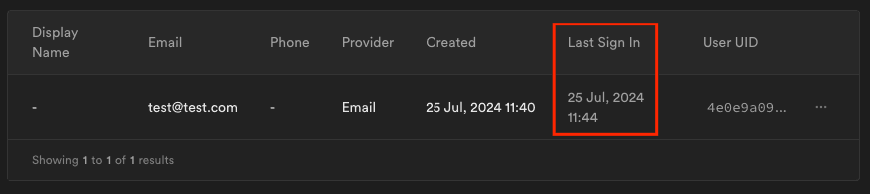
로그인은 잘 된 것 같아요.
이제 프런트엔드에서 어떤 코드들이 있는지 살펴볼께요.
우선 package.json을 열어보면 @supabase/supabase-js와 @supabase/ssr 라이브러리가 눈에 띄네요.
supabase에는 두가지 유형의 클라이언트가 있습니다.
- 클라이언트 구성 요소 클라이언트
@supabase/supabase-js: 브라우저에서 실행되는 클라이언트 구성 요소에서 supabase에 액세스 - 서버 구성 요소 클라이언트
@supabase/ssr: 서버에서만 실행되는 서버 구성요소, 서버 작업 및 경로 핸들러에서 supabase에 액세스@supabase/ssr는 Server-Side Auth를 위한 패키지에요. 사용자 세션을 저장하기 위해 쿠키를 사용하도록 supabase 프로젝트를 빠르게 구성하는데 필요한 기능들이 있어요.
// utils/supabase/client.ts

import { createBrowserClient } from '@supabase/ssr'

export function createClient() {
  // Create a supabase client on the browser with project's credentials
  return createBrowserClient(
    process.env.NEXT_PUBLIC_SUPABASE_URL!,
    process.env.NEXT_PUBLIC_SUPABASE_ANON_KEY!
  )
}
// utils/supabase/server.ts
import { createServerClient, type CookieOptions } from '@supabase/ssr'
import { cookies } from 'next/headers'
export function createClient() {
const cookieStore = cookies()
// Create a server's supabase client with newly configured cookie,
// which could be used to maintain user's session
return createServerClient(
process.env.NEXT_PUBLIC_SUPABASE_URL!,
process.env.NEXT_PUBLIC_SUPABASE_ANON_KEY!,
{
cookies: {
getAll() {
return cookieStore.getAll()
},
setAll(cookiesToSet) {
try {
cookiesToSet.forEach(({ name, value, options }) =>
cookieStore.set(name, value, options)
)
} catch {
// The `setAll` method was called from a Server Component.
// This can be ignored if you have middleware refreshing
// user sessions.
}
},
},
}
)
}서버 구성 요소는 쿠키를 쓸 수 없으므로 만료된 인증 토큰을 새로 고치고 저장하려면 미들웨어가 필요해요.
supabase.auth.getUser를 호출하여 인증 토큰을 새로 고침 합니다.request.cookies.set을 통해 새로 고침된 인증 토큰을 서버 구성요소에 전달하여 해당 구성요소에서 동일한 토큰을 직접 새로고치려고 시도하지 않도록 합니다.- 새로 고침한 Auth 토큰을 브라우저에 전달하여 이전 토큰을 대체합니다.
response.cookies.set으로 수행됩니다.
// middleware.ts

import { type NextRequest } from 'next/server'
import { updateSession } from '@/utils/supabase/middleware'

export async function middleware(request: NextRequest) {
  // update user's auth session
  return await updateSession(request)
}

export const config = {
  matcher: [
    /*
     * Match all request paths except for the ones starting with:
     * - _next/static (static files)
     * - _next/image (image optimization files)
     * - favicon.ico (favicon file)
     * Feel free to modify this pattern to include more paths.
     */
    '/((?!_next/static|_next/image|favicon.ico|.*\\.(?:svg|png|jpg|jpeg|gif|webp)$).*)',
  ],
}

// utils/supabase/middleware.ts

import { createServerClient, type CookieOptions } from '@supabase/ssr'
import { NextResponse, type NextRequest } from 'next/server'

export async function updateSession(request: NextRequest) {
  let supabaseResponse = NextResponse.next({
    request,
  })

  const supabase = createServerClient(
    process.env.NEXT_PUBLIC_SUPABASE_URL!,
    process.env.NEXT_PUBLIC_SUPABASE_ANON_KEY!,
    {
      cookies: {
        getAll() {
          return request.cookies.getAll()
        },
        setAll(cookiesToSet) {
          cookiesToSet.forEach(({ name, value, options }) => request.cookies.set(name, value))
          supabaseResponse = NextResponse.next({
            request,
          })
          cookiesToSet.forEach(({ name, value, options }) =>
            supabaseResponse.cookies.set(name, value, options)
          )
        },
      },
    }
  )

  // refreshing the auth token
  await supabase.auth.getUser()

  return supabaseResponse
}
로그인 페이지의 singIn 함수의 코드에요.
supabase의 패키지에서 제공하는 signIWithPassword 함수를 이용해서 로그인 처리를 합니다.
// app/login/page.tsx

  const signIn = async (formData: FormData) => {
    "use server";

    const email = formData.get("email") as string;
    const password = formData.get("password") as string;
    const supabase = createClient();

    const { error } = await supabase.auth.signInWithPassword({
      email,
      password,
    });

    if (error) {
      return redirect("/login?message=Could not authenticate user");
    }

    return redirect("/protected");
  };
supabase.auth.getUser() 를 통해 사용자 정보를 가져오고 있어요.
일단 예제여서 특별한 기능없이 아주 간단간단하게 되어있는 것 같습니다.
// components/AuthButton.tsx

import { createClient } from "@/utils/supabase/server";
import Link from "next/link";
import { redirect } from "next/navigation";

export default async function AuthButton() {
  const supabase = createClient();

  const {
    data: { user },
  } = await supabase.auth.getUser();

  const signOut = async () => {
    "use server";

    const supabase = createClient();
    await supabase.auth.signOut();
    return redirect("/login");
  };

  return user ? (
    <div className="flex items-center gap-4">
      Hey, {user.email}!
      <form action={signOut}>
        <button className="py-2 px-4 rounded-md no-underline bg-btn-background hover:bg-btn-background-hover">
          Logout
        </button>
      </form>
    </div>
  ) : (
    <Link
      href="/login"
      className="py-2 px-3 flex rounded-md no-underline bg-btn-background hover:bg-btn-background-hover"
    >
      Login
    </Link>
  );
}
예제 프로젝트에서는 로그인 기능만 있어서 DB의 데이터를 어떻게 CRUD를 할 수 있는지 레퍼런스를 살펴봤습니다.
supabase-js를 사용하여 Postgres 데이터베이스와 상호작용하고, 데이터베이스 변경사항을 수신합니다.
기본 문법은 간단하지만 꽤 다양하게 데이터를 처리할 수 있는 것 같아요.
Fetch Data
// Getting your data
const { data, error } = await supabase
  .from('countries')
  .select()

// Selecting specific columns
const { data, error } = await supabase
  .from('countries')
  .select('name')

// Query referenced tables
const { data, error } = await supabase
  .from('countries')
  .select(`
    name,
    cities (
      name
    )
  `)

// Query referenced tables through a join table
const { data, error } = await supabase
  .from('users')
  .select(`
    name,
    teams (
      name
    )
  `)

// Query the same referenced table multiple times
const { data, error } = await supabase
  .from('messages')
  .select(`
    content,
    from:sender_id(name),
    to:receiver_id(name)
  `)

// To infer types, use the name of the table (in this case `users`) and
// the name of the foreign key constraint.
const { data, error } = await supabase
  .from('messages')
  .select(`
    content,
    from:users!messages_sender_id_fkey(name),
    to:users!messages_receiver_id_fkey(name)
  `)

// Filtering through referenced tables
const { data, error } = await supabase
  .from('cities')
  .select('name, countries(*)')
  .eq('countries.name', 'Estonia')

// Querying referenced table with count
const { data, error } = await supabase
  .from('countries')
  .select(`*, cities(count)`)

// Querying with count option
const { count, error } = await supabase
  .from('countries')
  .select('*', { count: 'exact', head: true })

// Querying JSON data
const { data, error } = await supabase
  .from('users')
  .select(`
    id, name,
    address->city
  `)

// Querying referenced table with inner join
const { data, error } = await supabase
  .from('cities')
  .select('name, countries!inner(name)')
  .eq('countries.name', 'Indonesia')

// Switching schemas per query
const { data, error } = await supabase
  .schema('myschema')
  .from('mytable')
  .select()
Insert Data
// Create a record
const { error } = await supabase
  .from('countries')
  .insert({ id: 1, name: 'Denmark' })

// Create a record and return it
const { data, error } = await supabase
  .from('countries')
  .insert({ id: 1, name: 'Denmark' })
  .select()

// Bulk create
const { error } = await supabase
  .from('countries')
  .insert([
    { id: 1, name: 'Nepal' },
    { id: 1, name: 'Vietnam' },
  ])
Update Data
// Updating your data
const { error } = await supabase
  .from('countries')
  .update({ name: 'Australia' })
  .eq('id', 1)

// Update a record and return it
const { data, error } = await supabase
  .from('countries')
  .update({ name: 'Australia' })
  .eq('id', 1)
  .select()

// Updating JSON data
const { data, error } = await supabase
  .from('users')
  .update({
    address: {
      street: 'Melrose Place',
      postcode: 90210
    }
  })
  .eq('address->postcode', 90210)
  .select()
Upsert (patch) Data
// Upsert your data
const { data, error } = await supabase
  .from('countries')
  .upsert({ id: 1, name: 'Albania' })
  .select()

// Bulk Upsert your data
const { data, error } = await supabase
  .from('countries')
  .upsert([
    { id: 1, name: 'Albania' },
    { id: 2, name: 'Algeria' },
  ])
  .select()

// Upserting into tables with constraints
const { data, error } = await supabase
  .from('users')
  .upsert({ id: 42, handle: 'saoirse', display_name: 'Saoirse' }, { onConflict: 'handle' })
  .select()
Delete Data
// Delete a single record
const response = await supabase
  .from('countries')
  .delete()
  .eq('id', 1)

// Delete a record and return it
const { data, error } = await supabase
  .from('countries')
  .delete()
  .eq('id', 1)
  .select()

// Delete multiple records
const response = await supabase
  .from('countries')
  .delete()
  .in('id', [1, 2, 3])
마치며
예제와 문서를 보면서 클라이언트와 서버 환경 두 곳에서 동일한 방식으로 작업할 수 있고 타입스크립트를 지원하여 타입 추론을 쉽게 할 수 있는 등 개발자 경험에도 꽤 신경쓴 듯한 인상을 받았어요.
프런트엔드 개발에 더 집중하기 위해 백엔드 관련 부분은 supabase를 통해 사이드 프로젝트에 적용해보거나 중소형 프로젝트에서는 충분히 사용해볼만하지 않을까 해요.
감사합니다.